7.29.2008

Basic Gray Experiment

Normally I would never pick gray for any project but today I made an exception. I have lots of Soft Sky cardstock that I would love to use up before the new colors come out. So I pulled out my new Fresh Cuts Stamp set (available in the new catalog) and began playing. As I was digging through my filing cabinet for some Whisper White I spotted the Basic Gray file. So I pulled out a piece of it set it next to the Soft Sky and "voila!" a color scheme is born. I think I am going to have to play with Basic Gray more often it is growing on me. :-)

I am trying to dress up my cards a bit, I tend to make very square cards (BORING, I know) so I experimented a bit with the Round Tab punch and really like how it seems to finish off the card. I am in love with the finished project. I also LOVE the double stitched ribbon we had this year, I hope it carries over into the new Catalog Look for it in the mail for an invitation to my upcoming Catalog debut party!!! I am sending it out to my fabulous customers as a special thank you gift for another great Stampin' Year!!

Recipe: Stamps--Fresh Cut; CS--Whisper White, Basic Gray & Soft Sky; Ink--Basic Gray & Soft Sky; Ribbon--Double-stitched Soft Sky; Embellishments--Pewter Brad; and Tools--Tab Punch.

7.28.2008

Enjoy!

Here is another card from this year's Stamp Club. Since this was my first year as a SU! Demonstrator (since May of 2007) and my first Stamp Club I kept things simple. 80% of my customers are fairly new to cardmaking and stamping as well (just like me). I had never stamped before I hosted a SU! workshop last year. I am an avid scrapbooker though and loved being able to find a new technique for scrapbooking. I immediate;y fell in love with all things SU! and had to sign up!

I am so excited about this year's club where we can try out a new technique each month!!!


Recipe: Stamps--Enjoy Every Moment; CS--Wild Wasabi, Bashful Blue, Real Red, Pumpkin Pie & Whisper White; Ink--Real Red (marker), Pumpkin Pie (Marker) & Bashful Blue.

7.25.2008

Scallop Flower & Leaf Tutorial

I have decided to venture into the world of online tutorials. A very daunting endeavor indeed. So I decided that since I am a beginner at this that I would start with something easy. So here is my "Scallop Flower & Leaf tutorial". I first saw this technique at the 2007 Portland SU! Regionals (can't remember who showed it, but I will try to find it in my notes). I have seen lots of demos do the same technique (many who weren't at that event). Here is Patty Bennet's version of this card and flower.

So here is my Friend card that started this whole project, actually there is more to this card but that will have to wait until another post. I LOVE this card!!! I know, I know...I am a bit biased but I can't help it! You can't tell in the picture but the flowers and friend tag are popped up with dimensionals.


Recipe: DSP--Berry Bliss; CS--Very Vanilla, Pretty in Pink, Green Galore; Stamps--For A Friend (Hostess Set); Ink--Chocolate Chip, Pretty in Pink (Marker) & Green Galore (Marker); Embellisments--Staples & Pink Grosgrain Ribbon (non-SU!); Tools--Scallop Punch, 1 3/8" Punch & 3/4" Punch.

So here's how I made the adorable flowers:
1.) Punch a Scallop out of Cardstock.

2.) Take a pair of Paper Snips (large scissors will not work for this project) and very carefully cut between scallops (in the valleys) making a very narrow slit. Do this all the way around the scallop, this will create the "petals".

3.) Punch a 3/4" circle out of Cardstock for the center of the flower. I attached mine with a Stampin' Dimensional.

4.) Next punch a 1 3/8" circle out of cardstock. Take the circle and slip it back into the circle punch about halfway (this will give you an oval with two pointed ends). Punch it. Now you have a leaf. Repeat this with the other half of the circle.


5.) Attach your leaves to the back of the flower.

6.) Now you have an adorable 3-D flower to use for scrapbooking, cards, etc.


You probably noticed that my table seems a bit messy during this tutorial. Well, I made this card in an impromptu all-night stamping marathon with my mom. We got so busy creating that we just forgot about the mess and had fun. I thought I would share a bit of our "creative chaos" with you. Yes, believe it or not, we did get a lot accomplished despite the mess. I will post our big projects this week.

7.23.2008

For a Birthday "Cutie Pie"

Here is another card that my mom, Lyn, made. The picture came out a little dark. I think it is time to retire my point and shoot Nikon for an upgrade. Oh darn! :-) Oh well, it works for now. Enjoy the card!


Recipe: DSP--Cutie Pie; CS--Bashful Blue, Old Olive, & Whisper White; Stamps--For A Friend (Hostess Set); Ribbon -- Non-SU!; Ink--Old Olive & Unknown.

7.21.2008

Spring Fling Flower Cards

As you all know, with the addition of child number 3 in our family, it has been a little difficult to spend a whole lot of time stamping. But I don't want my blog to just be where I put information about SU! promotions and my classes either. I want it to be a resource full of stamping ideas for all of you. So since I've been so busy keeping up with my kids I thought I would CASE some cards from someone else, my Mom, Lyn! Many of you know that she is a huge stamping addict and spends many hours relaxing while making cards and other projects. She is also very creative and I am so excited to share these two cards with you.


Recipe: DSP--Spring Fling; CS--So Saffron, Whisper White & Certainly Celery; Stamps--Blooming With Love; Ribbon--Non-SU!; Ink--Basic Black & (Unsure of coloring method).

Dahlia Fold

This is a beautiful card we did using the "Dahlia Fold" technique. It is very easy to do. It just requires circle punches and a bone folder. Click here for a link on a tutorial for the "Dahlia Fold". I used paper from the Bali Breeze DSP to make the flower. This was one of my Stamp Club projects from this year.

Recipe: DSP--Bali Breeze; CS--Tempting Turquoise & Pumpkin Pie; Stamps--Embrace Life; Ribbon--Polka Dot Purely Pomegranate (Sherbert Ribbon Original) and Embellishments--Black Brads.

7.20.2008

Accessory Sale!!!!!

Stampin' Up! is having a SALE!!!! And who doesn't love a sale? Click on this link to see the list of items that are now 25% off the catalog price. The sale starts on Monday so be sure to order as soon as possible to make sure you don't miss out. Supplies are limited. Happy Shopping!

7.16.2008

Stamp Camp Prep

Ever wonder what it looks like preparing for a large Stamping Event? This weekend is our All-Island Stamp Camp. My fellow Demonstrators, Lynda & Jennifer, spent hours cutting over 2,000 pieces of cardstock. So for those of you going this weekend you will get to see how all this paper will make a beautiful box and 12 coordinating cards.

Thank you so much ladies for all your hard work. I cannot wait for this weekend's Stamp Camp! Happy Stamping!!

7.10.2008

Summer, Vacation & Pink Lemonade!!

I hope you are all enjoying your summer (now that it has finally arrived)! I am finding it hard to get stamping in with three little ones at home. I did find time to stamp the following card for my Mom's Birthday. I cannot take the credit for this card. I got the idea from another Demonstrator named Cheryl Elenbaas. I saw her card and knew that I had to recreate it.

RECIPE: CS - Pretty in Pink, Whisper White, Green Galore, & Vellum; INK - Pretty in Pink & Green Galore; STAMPS - Tart and Tangy & Absolutely Fabulous.

7.01.2008

Decor Elements Debut

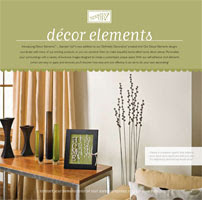
Today is such an exciting day for Stampin' Up! As many of you may know Stampin' Up! Has stamps they have earmarked in the catalog that can be used for stamping on your walls, furniture or other projects. I have not tried to do this but I have seen other people's beautiful creations. I love our stamp images and would love to be able to incorporate them into a room's décor but am never quite sure how to do that.

SU! Has just announced a new product that will allow us to be creative at home and use their fantastic artwork as well. Starting July 1st we will begin selling Decor Elements. These are vinyl images you can put onto your walls. You can now redecorate without painting! Who doesn't love that? Plus you can coordinate your room's new décor with stamped projects you've created. All the images in our Décor Elements have a coordinating stamp set.

The vinyl images rub-on (similar to paper rub-ons) and are simple to remove when you want to change the look. Right now the images are only available in white and chocolate. Keep checking back over the next year as SU! Adds more images and colors to the line. As a special sneak peak to all my favorite customers I am enclosing a link so you can go check out these new products yourself. Let me know what you think about our new product and you will get to choose a free card from my goodie box!

in August to see how I use our new Décor Elements in my daughters’ room. Maybe it will inspire you to get creative!